Monday, June 11, 2012

Rave: Foldable bags from Indonesia

My parents came back from a trip to Indonesia recently with a truckload of stuff! And obviously, there would be stuff that they have bought for us! 

Other then the common crackers and cakes that can be bought from Indonesia, my mother also bought various designs of a foldable bag!

Even though its slightly on the smaller side, it can be easily brought to a picnic or to the beach. And after all the food have been eaten up, you can fold back the bag and store it into your hand carry bag without taking up a lot of space!

Here's how it looks like when its not in use!


Its simply just a rectangular flat piece that can easily slot between your papers or can be put at the bottom of your bag to help your bag maintain its shape. 

When in need, just slip it out of the bag, and turn it into the bag and it'll be ready to use.

First, unzip the zip.

It will look like this after being unzipped.


After which, just proceed on to put your things inside and this is how it will look like! 

It is light and small and I'll definitely see myself using it regularly in the near future. Since I LOVE to have picnics! And better still, the mesh material makes it easy to clean which is a plus point! Everybody hates to have to wash their bags right after a trip to the beach. However, for this bag, just soaking it overnight in water or just plain rinsing it would do the job! No need for wiping bags slowly till no end anymore!

Many thanks to my mum who bought these for me! :D

Saturday, June 9, 2012

MAC paint pots in Indianwood and Groundwork

Here is the long awaited post that includes the swatches of both MAC paint pots that I bought. As you guys know, I bought 2 MAC paint pots from the MAC counter in Paris international airport.


I love their packaging! Even though some may think its plain, I feel that the black cap just makes the whole jar look very chic~

The two that I bought were Indianwood and Groundwork respectively.

For starters, here's how they look in the pots themselves.

Left: Groundwork
Right: Indianwood

Getting down to the nitty gritty details, MAC paint pots consists of 5 grams of product. That is quite a large amount of product considering that you only can put so much on your eyes. Therefore it'll definitely last a long time and is totally worth your money. 

Here are some swatches of both colours on my hand.

As can be seen from the swatches, both colours are more or less similar. However, Indianwood can be said to be much more of a bronzy colour. Its like adding gold shimmer on Groundwork would give you the colour seen in Indianwood. As for Groundwork, it is more of a matte taupe/brown colour. From my experience, I feel that matte colours are easier to work with as you do not have to care about 'sprinkling' your whole face with glitter.

**FYI: Matte colours are more suited for mature people while young people are able to pull off shimmery colours better. This does not mean that older people can't wear shimmery colours. If you can pull it off, go for it! :)

Application wise, you could apply it using clean fingers or an eye brush all over your lid.

I personally would recommend applying Indianwood all over your lid. However, for Groundwork, I would recommend just applying it to your crease and the outer corners of your eyes to create more depth. This can be created by just dipping a crease brush with groundwork and working your way in slowly until satisfied.

Looking at the picture shown below, I have applied Indianwood to my whole eyelid using my figures and used a crease brush to add a little but of groundwork at the corners to make it slightly darker. After which, just blend. 


It is a natural everyday look that can be worn both in the day or night and is fairly simple to re-create.

These paint pots can also be used as a base/primer. After which, you can just apply other eye shadow colours above it to create a more intense look.

The staying power of these paint pots are incredible! They just stay on all day long without budging at all even when you perspire!  

Price: S$33 or US$17.50
Product: *****
Would I buy it again: Yes. However I would buy them in other colours as I predict that these will last me a long time!

Review: MAC Studio Tech Cream Foundation

If you have seen my previous haul post, you would have known that I had recently bought MAC Studio Tech Foundation in Europe. 

First and foremost, showing you the classic MAC black foundation compact. 

If you are new to the brand MAC and wish to try one of their foundations but do not know what foundation shade are you, fret not! Just approach one of the sales ladies there and ask them what shade would suit you the best. All of them are really nice and would help you choose the right shade by applying it to a part of your face so that you are able to see the difference. 

In addition to that, say you do not know what foundations to try (MAC have many types of foundations), just ask them to recommend one for you. Just tell them your skin type and they would recommend the foundation best suited for your skin. For some, even before you tell them your skin type, they would know just by looking at your face. So dun feel offended or what not if they are staring intently at your face! Haha! 

Moving on... 

My foundation shade for MAC is NC35. Apparently,from what I have gathered,the NC stands for those with warm undertones (where your skin looks slightly yellower when your veins are green in colour) while NW stands for those with cooler undertones (when your veins on the inside of your wrists looks blue). I do not know why C stands for warm while W stands for cool. Apparently for MAC, the opposite applies!

**Just for those of you who do not know. If the veins on the inside of your wrist is a mixture of blue and green, it most probably means that you are a neutral shade. 

The foundation compact can be opened by clicking it open. 

Was pleasantly surprised to see that the foundation was sealed beforehand. This goes to show that nobody has used it before and that it is hygienic.

The interesting thing about this compact is that you are able to lift the lid up and there you have it! Your sponge! 

The only con about the area where the sponge is that there are holes at the bottom. Hence bacteria would be able to go onto the sponge. Hence I would recommend that you clean the sponge daily to prevent breakouts etc. I would say this foundation is of medium to high coverage. 

As all MAC foundations go, if I'm not mistaken, all the compacts comes with a mirror attached too!

Moving on to the application, first apply a thin layer to your face. After which, dab the parts of your face which needs more coverage with more foundation and your skin would look flawless. This foundation is build-able. The best thing about this is that it feels really light like there is nothing on your face. 

The foundation stays on for quite a while. It stays on me for the whole time I'm out without the need to retouch. But this actually depends on one's skin type and how your skin reacts to the product. So the lasting power varies with different people. 

As for the application wise, so far I have used a brush, disposable sponges and the sponge provided in the compact. I feel that the application is the easiest and smoothest when using the sponge provided by MAC. So yea, if in a rush, and in need of coverage, I can just easily pop this into my bag and put it on when I have the time to. 

Price wise, it is fairly on the higher end as compared to drugstore products (loreal, rimmel etc). However, if the product is good, I don't mind paying more just for it! Also, the foundation has 10grams (0.35oz) of product which would be enough to last you a fair bit.

Price: S$54 or 30USD
Product: ****
Would I buy it again? Yes. 

Thursday, June 7, 2012

2nd Haul Post: Mac, L'Occitane, Bobbi Brown

Here comes part 2 of my haul series that I bought from Europe! 

As can be seen from the title, some of the products I bought from Europe include brands like MAC and Bobbi Brown. As I did not buy them during my time in the US sometime last year (Regretted it like crazy!), I decided to buy them in Europe. It is much cheaper than buying them in Singapore where the prices of the products of such brands are super overpriced. Even buying from sprees is slightly more expensive than buying from Europe. Speaking of which, let's start of with the MAC products that I got from Europe. Am really excited as these are the first few MAC products that I own! Quite surprising for a makeup junkie like me! However, this always happens as I am not willing to spend an unreasonable amount on a product in Singapore when I can get it overseas at about half the price! In total, I bought 3 MAC products. 

Firstly, the MAC Studio Tech Foundation which I got in London from Selfridges & co. It is a cream foundation. Cream foundations are good for people who have dry skin. (I personally have dry to combination skin) After reading and watching videos regarding reviews of this foundation, I decided to give it a go. Been liking it so far. I actually wanted to get the MAC Full Coverage Foundation. However, if I'm not wrong, they only sell it in MAC pro stores. Hence I decided to settle for this product. 

The next 2 items that I got from MAC are their paint pots which I bought from the MAC counter at the Paris airport. I got them in 2 different colours. More specifically in indianwood and groundwork

Heard rave reviews about the groundwork paintpot from both missglamorazzi and Fleurdeforce on youtube. They are both 2 of my favourite youtube makeup gurus. And sure enough, groundwork is really good! As for indianwood, I swatched it at the MAC counter and fell in love with the colour instantly. Both paint pots are kind of similar. However, groundwork is more of a matt colour while indianwood is shimmery. So far, I'm loving both colours. More so for groundwork as I feel that it is much easier to work with due to it being matt as compares to indianwood where it is slightly shimmery. 

The thing I love about paint pots are that when one is in a hurry, you are able to just apply it all over the lids and would be ready to go out in a jiffy. It is quick and easy and is currently one of my favourite products of the month of June.

Moving on, the next thing I bought was the 
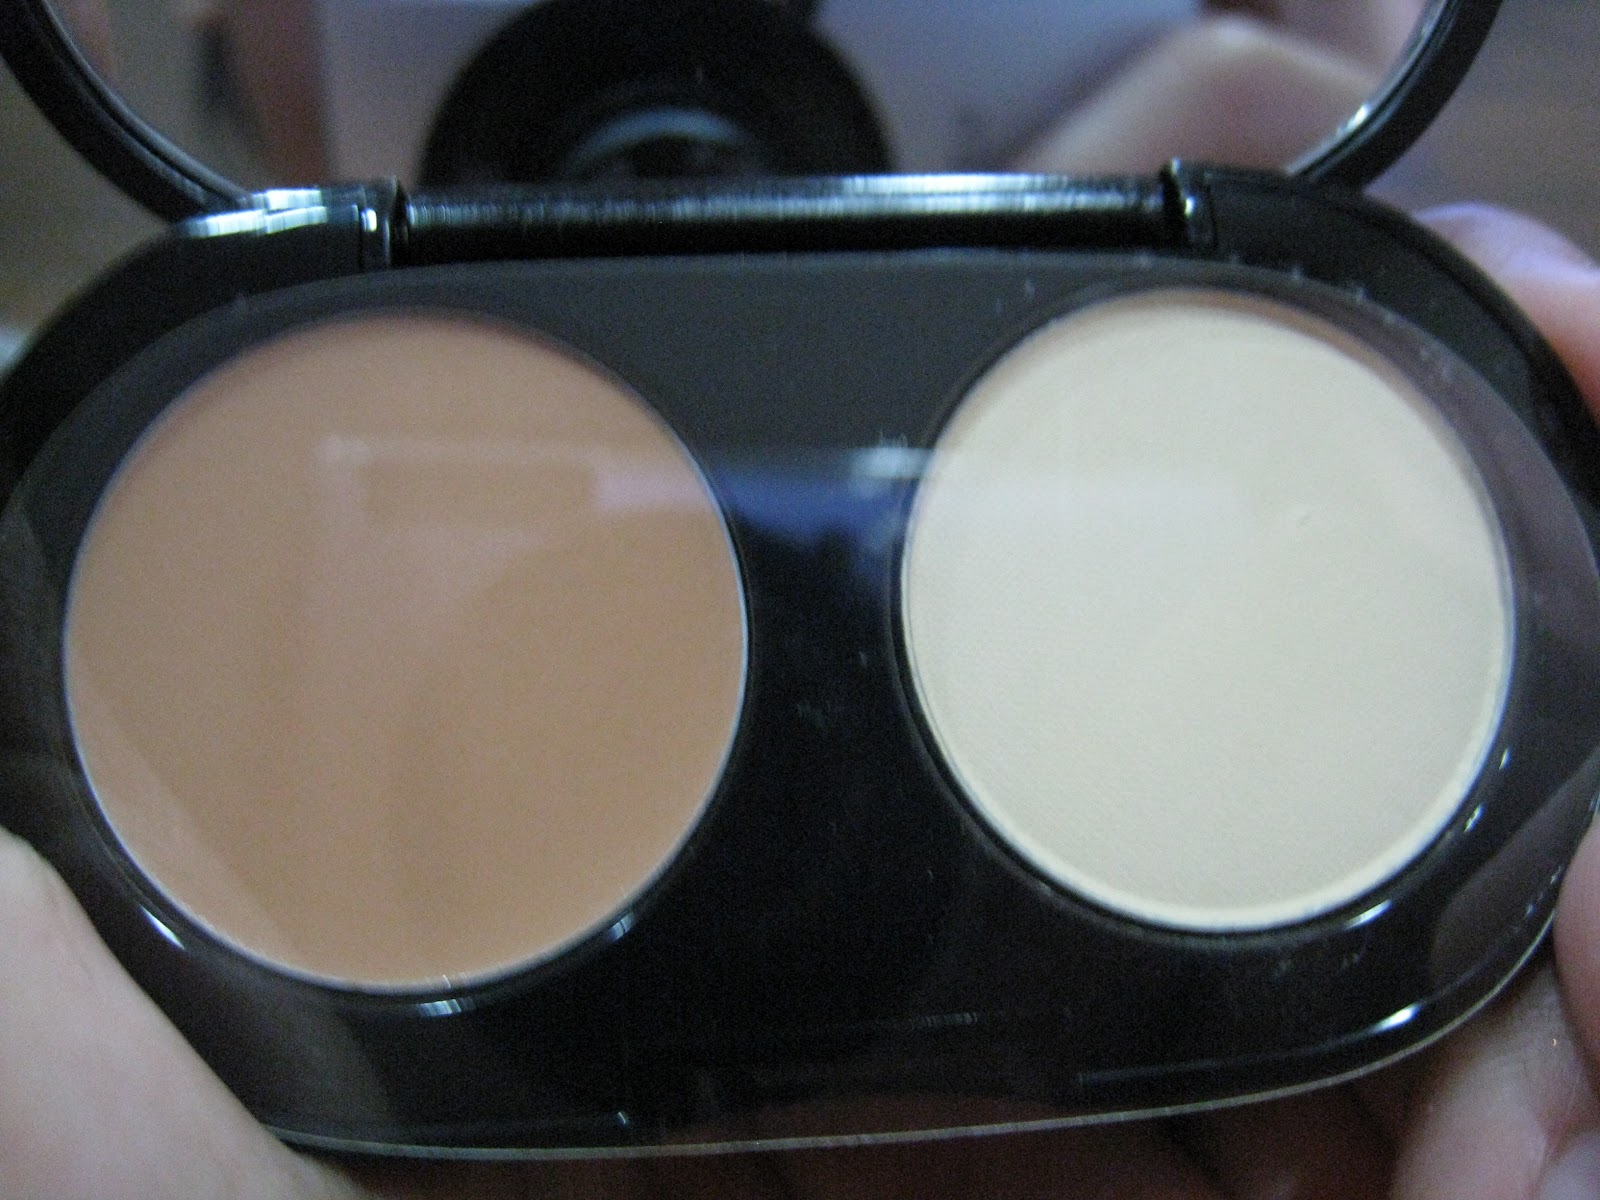
Bobbi Brown Creamy Concealer Kit also from Selfridges & co. Been hearing really good reviews of it on the YouTube beauty world. Hence I decided to give it a try.

This is how it looks on the inside. On the left side is the Creamy Concealer in Natural Tan while on the right side is the Sheer Finish Pressed Powder in Pale Yellow. Please don't mind the slightly reflective image as I took the picture with the plastic on it. 
So in this case, you are supposed to use the creamy concealer first and set it afterwards with the pressed powder. I think that this is great for touch-ups where you would not need to bring out your big container of foundation and pressed powder to set your makeup. Just bringing this concealer kit and using it to touch up would be fine. It is super convenient.

The last item that I bought from Selfridges & co was..... KIEHL'S Ultra Facial Cream!
The weather in London was super cold~ Since I already had dry skin, in the cold weather, my skin become so bad that there was skin flaking off the corners of my mouth and at the ends of my nose. It was super painful. Since I've bought it in the US before and know that it works, I went straight to buy this and the rest is history! After 3 days, my skin was smooth and supple. Enough said.

I did a review on it before. Click here to see.

Proceeding on to my buys from L'Occitane!

I bought their Hand Purifying Gel.

Even though it smells like any other anti-bacterial gel, I liked this quite a bit. It does not leave your hands with the 'sticky' feeling that other hand sanitizers does. Since it was cheap there, I bought it and it has been in my carry on bag ever since! :)

Last thing that I bought from L'Occitane was their hand cream. They were selling a set of 3 minis for just 20 euros. Which is considered really cheap. So I bought it. It consisted of the Cooling Hand Cream Gel, a Lavender and a Rose scented hand cream. 

Kept the Lavender one for myself while I gave the rose scented one to my mum and the cooling one to my older sister. Been loving it so far. I don't really see any improvements in my hands as I have been regularly putting body cream on them even before buying this. This is definitely a splurge for me. But I mean, when you are on a holiday, anything goes! There's no time for stressing but only relaxing and enjoying one's time! 

Did not take a picture of the Rose scented one as I have already gave it to my mum! haha~

That's all for this haul post!

Will create various posts in the near future with swatches of both the paint pots and in depth reviews on the foundation and concealer.

Till next time! :D

Monday, June 4, 2012

Beauty tip for June


Been wishing for smooth kissable lips?

Ever wanted to buy a lip scrub but have been holding back due to them being too expensive? It is not necessary to own a lip scrub as there are so many other methods to make your lips feeling smooth and soft. Buying a lip scrub is usually an indulgence for many. 

For those who are on a tight budget, here are some cheaper alternatives that you might want to consider:

1) Using plain sugar and rubbing it against your lips. Wash off after you are satisfied with how your lips feel.

2) Use a toothbrush. A simpler method would be to just use your toothbrush to GENTLY brush against your lips after you are done with brushing your teeth. This helps to get rid of the dry or flaky skin on your lips easily. Remember, the point is to GENTLY brush. 

3) Last alternative would be to use a damp towel (wet with water) and gently rub it against your lips till you are once again happy with how it feels and looks.